Blog

The Artwork of Shawn Falchetti
Gunks Climbing - Update

Monday, May 15th, noon. Shawangunks Mountain Range, New York

Shockley's Ceiling, belay ledge at the end of the first pitch:

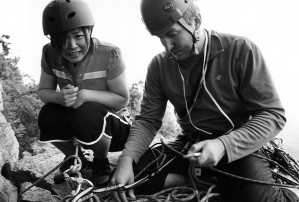
Naoko rubbed her hands together, wringing the water from them and trying to stave off some of the numbness. Overhead the dark gray sky spilt water down upon us, catching onto a slight rocky overhang to form a natural rain gutter whose overflow was bathing us in cold splatter. I could see that Naoko was regretting leaving her jacket at the base of the cliff. Craig busily juggled a series of cams and nuts, searching through the slick, wet fissures in the ledge to find good anchor points for our rappel. It was a three pitch climb and we had just finished the first before the rain spilled upon us. There were no rappel rings on this pitch; to bail here, Craig would have to build us a rappel point, and, unfortunately, abandon some of his gear in the process. A hazy, gray mist obfuscated the valley span below; it was a remarkable view of bushy tree lines from our perch 60 ft up. I wondered about the other two climbers who had passed us earlier on a parallel route. Their ropes had been pulled up out of sight about 30 minutes ago, and we didn't hear anymore belay calls from them. Had they outclimbed the storm and found a spot to hike down from, or were they also sitting quietly drenched on a higher ledge, mirroring us, looking out over the rainy valley? Craig coiled the rappel line, peered over the ledge, and tossed the green rope wide over the cliff.

Dallas, PA, 8 hours earlier

I squinted through the darkness at the buzzing alarm, a pillow crumpled half over my head. A soft blue glowing display read 4:45 am. I was wired the previous night from anticipation of the climb, and couldn't fall asleep until after midnight. I got up, stumbled through the morning routines, did a final gear check, and munched on a peanut butter sandwich as a car pulled into my driveway. A knock on the door, then Craig drove the two of us off to the meeting point in Wilkes-Barre at the Wilkes-Barre Rocks Climbing gym. The weather looked dicey, and we had an uncertainty about if anyone would show. After 10 minutes of sitting in the dim light of the early morning packing lot, Naoko's truck pulled along side us. Shortly afterwards, the remainder of the climbers pulled into the parking lot. Splitting up into two cars, we began the 2.5 hour drive to the Gunks, New York.

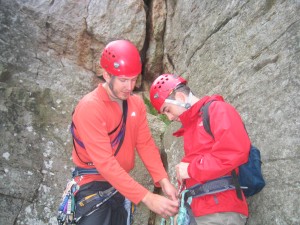
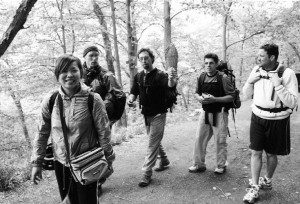
Spirits were high when we met up at for breakfast in a small deli near the Gunks. A short drive to the Trapps had us park at the base of the Stairmaster. The aptly-named Stairmaster is an extended series of stone steps which form the ascent to the base of the cliff. Since you are loaded up with ropes, water, and climbing gear, it gets the blood pumping. Everyone was a little winded when we arrived at the cliff, and after a brief discussion of group pairings, we split into three groups. My group was Craig (our lead climber), myself, and Naoko. Today would be Naoko's first outdoor climb.

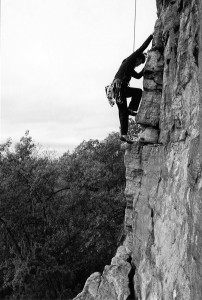
Shockley's Ceiling was our target, a 5.6 three pitch climb which had the quirky tradition of occassionally being climbed in the buff by free-spirited climbers. We decided to keep all of our clothes on. After the usual set-up and pre-climb checks, Craig began his first lead ascent, and soon disappeared beyond the roof of the initial couple moves. I followed, removing the gear as I went, with a second rope trailing from me. This would form a top-rope route for Naoko. The first of the three pitches was graded 5.4, although a few of the corners, and, in particular the initial roof, I thought were harder. Naoko had no problems with them though, and soon joined us on our ledge 60 ft up. Craig pulled out his guidebook and began mapping the second pitch, choosing a traverse to begin. In no time he had his first piece of protection placed. Just then he said, "and I just felt a few drops of rain."

A uneasy moment passed as me and Naoko looked up, and I heard the soft pop of raindrops on my windbreaker. "Yeah, me too," we both said. We wondered if we should continue and try to make the second pitch, or figure out how to get down. After a short discussion, we decided to wait a few minutes on the ledge and see if it was a false alarm. Craig back climbed to us, removing the piece of protection he placed. Over the course of the next ten minutes, the fine mist evolved into a steady light rain, and the rocks started to glisten with wetness.

Shockley's Ceiling, 1st pitch ledge, 12:30 pm

Naoko was about to take a literal leap of faith. Holding onto the rappel rope with both hands just under her ATC, she needed to toss herself off the ledge, with 60 ft or air and rock below her. Craig had already descended and had her on a fireman’s belay, and, with it, could stop her descent if she had any trouble. This was her first rappel, and she got her lesson on a water covered ledge while shivering during a rainstorm. Although your brain gets its usual logical checklist reassurance of "the anchors are solid, my partner can stop me, everything will be fine, " there still is the overwhelming experience as you peer down over the cliff you're about to jump off of that says "you want me to do what?" Naoko does a great job and descends smoothly. I follow aftwards.

On the ground, Craig sees the other climbers descending I'd been wondering about earlier, Chris and Julia. Craig calls up to Chris, and he agrees to stop on our ledge and retrieve Craig's gear. The two climbers had made it to the next pitch before the rain hit, and sat soundly under a rocky overhang trying to wait out the rainstorm. The rain didn't let up, and they rappelled out like we did. As this was going on, I tilted my head back and stared up at the tall, dead tree near me. My green rope was wrapped high in its branches. The first rappel line to be thrown, it was rendered useless when it got tangled in the tree. It was brand new, and, like all climbing ropes, expensive. We were talking about cutting the rope to salvage part of it, but I was determined, and began jumping up and putting all my weight on it. The dead tree bent and protested, and, after the third yank, snapped at a thin point right on the top. The rope thudded down with a 12" section of branch. I cheered. We all collected our gear, met up at the cars, and headed to someplace warm and dry to get some food and hot tea.
approach-medium julia-ascent gear-check1 craig-naoko-ledge2

Virtual Pose 3

Virtual Pose 3 is an excellent book if you're interested in honing your figure drawing skills, but do not have a life drawing group to work with. The book is not instructional at all - instead it is a collection of photographed poses for your reference. Included are 4 female models and 2 male. Each page of the book has a layout of a model in a particular pose, photographed from 6 angles (60 degree increments rotating around the model). The photography is excellent - there is a pure white backdrop for all the models, and the contrast and lighting is very good. Poses are varied and interesting, with props incorporated into some (chairs, supports, etc), and a mix of lying, sitting, and standing positions. Lighting positions are also varied, with downlights in some, and more even frontal lighting for others.It wouldn't be a Virtual Pose book without some virtual component. This is one of the unique features I found to be superb - an included CD installs a 360 degree viewer on your computer, along with all of the poses listed in the book. Where the book has a particular pose photographed in 60 degree increments, the viewer allows much finer (10 degree) increments. You can rotate the model a full 360 degrees and choose your vantage point for the sketch. There are a total of 70 poses, with 36 views per pose, yielding 2,520 views.The one quirk of the book is photoshop censoring of certain parts of the female anatomy, seen in both the photos and computer viewer as blurred areas. Strangely there is no corresponding censoring on the male models. While I understand that some of the 360 degree poses put the models in some strange positions, it's not as if we hand out fig leaves in life drawing classes. Overall the censoring is mild, however, and should not affect any of your drawings.I recommend Virtual Pose 3 for anyone looking to build their figure drawing skills.

Anatomy for the Artist

Anatomy for the Artist is an excellent visual reference, full of both black and white and color poses of male and female models. The book is divided into the usual sections: Bones & Muscles, The Torso, The Hip and Thigh, etc Photos are accompanied by diagrams and sketches to illustrate the structures being highlighted. Perhaps the most interesting feature of the book are mylar overlays, where a photograph of a model has a corresponding overlay of the skeletal structure. Another interesting aspect is that often the male and female models are pictured side by side in the same pose.The last section of the book includes re-enactments of several famous paintings, where the model strikes the same pose as the painting's subject. Another section of interesting poses follows, and a section on the figure in motion closes.I found this book best for inspiration; the photographs are superb, and the poses and very interesting and dramatic. It is pricey; there are better, less expensive books out there if you're looking for instruction or poses, but if you don't mind spending a little more, you'll have a beautiful book of inspirational nudes.

The Art of Figure Drawing

The Art of Figure Drawing is a great book which packs plenty of learning into its 143 pages. Sketches done in conte, graphite, charcoal, ink, and watercolor fill its content. The book takes the usual formal approach to teaching figure drawing, from practicing shading spheres and cones at the start to blocking in and juding angles and proportions. There are many good lessons on shading (as well as examples of what not to do), and there are step by step instructions for practice drawings. Overall one of my favorite books for learning to draw the figure.

The 5 Essentials in Every Powerful Painting

The 5 Essentials don't only apply to paintings, but to any picture. Although the essentials are what you'd expect (good composition, good use of value and color...), the book breaks each one down in detail with striking examples. The paintings throughout the book are inspiritation, particularly in their use of color and value, and I find myself leafing through it periodically for inspiration. The book jacket has already become framed from me perusing it.

Artist's Manual

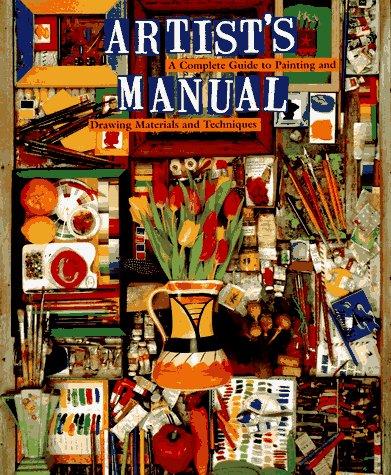
What a great reference book! 256 full color pages filled with artwork, pictures of materials, how-to's, and beautiful layout. The book covers 2-D art, heavily focused on painting, and has a full photo layouts of different types of brushes, supports, paints, etc. I think the book is best suited to the newer artist, since it is focused on the basics, but even the experienced artist will enjoy the loads of artwork which is featured.

Colored Pencil Explorations

I have to admit that I'm a fan of Janie Gildow's work, so it's not surprising that this book and her other show up on my recommended list. Janie covers a variety of mixed media techniques, from dissolving pigment to painting colored pencil over airbrushed art, and even drawing on 3d or textured surfaces (the polymer clay sculture with the mat is wild). Even if you don't work in mixed media, I still highly recommend this book as it presents possibilities you may not have considered.

Painting Light with Colored Pencil

This is my favorite colored pencil book! It covers all the basics, from how to compose and photograph a work, to pencils, erasers, papers, and studio equipment, then moves onto techniques. Beautiful drawings are presented step by step, with materials lists and detailed instructions. The subjects are varied and technically challenging; different textures, reflective, transparent, and luminous surfaces - and all of it is explained with patient, easy to understand pictures and text. This is a must have book for the colored pencil artist.

Colored Pencil Portraits: Step by Step

Here it is, the book the started it all for me. I was lurking in the art section at Barnes and Noble, looking for something new to try, and I stumbled across Ann's newly published book. My jaw dropped - I couldn't believe the work was from colored pencil. I scurried off with the book, promptly bought a box of Prismacolors, and became hooked. Aside from the excellent step by step instruction presented in the book, the best feature is Ann's skin tone formula. She presents a color list organized by value, instructions on how to make a reference skin tone scale, and a few simple rules for alternating orange, pinks, and yellows. Using this formula, you will produce radiant skin tones.

The last section of the book provides some great advice on commissioned work, contracts, and self-promotion.

This book was very influential for me - if you look at some of my earlier work (like "Pensive") - you'll see Ann's linear stroke technique, because I initially learned from this book. If you do figure drawings or portraits, this book is invaluable for teaching you how to tackle the tough subject of skin tones.

Capturing Soft Realism in Colored Pencil

Ann's second book breaks away from portraiture and tackles landscapes, fabrics, textures and surfaces. It is organized and presented in the same clear, easy to follow manner as her portrait book. The subjects are varied, and breakdowns are very helpful - I found the section on landscapes particularly helpful - especially since it gave great tips on how to render difficult subjects like grass. For textures and surfaces, I tend to like Janie Gildow and Cecil Baird's books better, but this is still a good addition to your collection.

Colored Pencil Solution Book

This is a must have for the colored pencil artist! The opening section includes a great overview of the different brands of colored pencil and their characteristics - this is one of the few books that has laid this all out in table form. The next section covers the usual basics - what tools you'll need, what makes a good composition, then it's on to the solutions. The book is structured as pages labeled with questions, such as "Can I liquefy the pigment of dry colored pencils?" , and then answers. The handling of tough surfaces and textures is broken down so clearly that you'll wonder why you ever thought it was challenging. At the end of the book, line drawings are provided from many of the examples, so you can transfer the outline and attempt the drawing yourself.

I can't begin to say how much I learned from this book, and I still reference it. This is a must buy!

Blue Nude

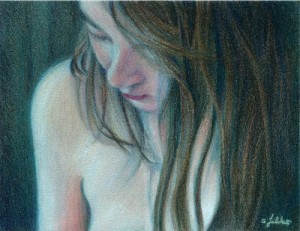
Rembrandt Lyra and Prismacolor colored pencils on light blue Colorfix paper, 12" x 9 " . Completed 2006.

blue-nude

This was my first Colourfix piece. There's an interesting story in my Art and Fear post about how I almost gave up and tossed this mid-piece. There was a definite learning curve with Colourfix, and the colors weren't cooperating. But I stuck it out, and in the end I really loved the piece. It did well - it went on to be juried into the CPSA Explore This! 4 national show. One of my favorite parts of this work is the streaming hair, which reminds me of water pouring over a ledge. I extended and stylized it a bit so that it sweeps all the way to the right. The other part I like is the borders of blue that come in and out around the hair. With all of the blues, and the hair pouring like rain, it would be easy for this piece to have a sad tone - but it doesn't. Like many of the blue series pieces it's about introspection, and the hint of a smile on the model warms up the mood.